How to make super computer?

Wednesday, February 6, 2013


Do you need a machine that can perform a thousand trillion calculations per second decimal? Building your own clusters of high-performance computer, or put it more bluntly supercomputer, is a challenge that every little better computer scientist can be overcome with a bit of money spent for a week. Technically speaking, modern, multiprocessor supercomputer consists of a network of computers that work together in order to solve a problem. In this article, we'll briefly cover each of the steps to be taken in order to have built a super computer in your garage

How to make a super computer

First you need to determine the hardware components and the resources you have available. You will need a major node, at least twelve identical nodes, Ethernet switch, power distribution units and base. Determine the volume of power that will be needed, the cooling system and the amount of free space in which to place the supercomputer. You must also specify the IP address that you use in your network, node name, which will install software packages and the technology with which to implement parallel data processing (we'll talk about this later).

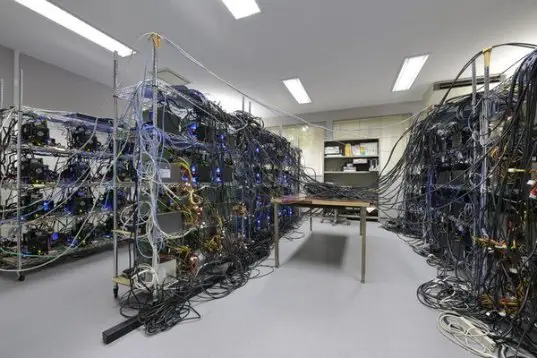
Build a computer nodes. Select a server chassis that provides most of the space, and the best cooling efficiency of electricity use. Reliable option is housing with four nodes and two identical power (search the Internet for this type of housing that is available to us). The second, and more likely, option is to use dozens of outdated servers. This will save you a lot of money. All processors, network adapters and motherboard should be identical to that would not be coming to the compatibility problem. Of course, do not forget the RAM and storage space to store each node. You must provide at least one optical ROM for major node.

Install the servers on the stand. Start from the bottom so it is not difficult to stand on the top. Most likely you will need the help of friends in this business because densely mounted servers can be very difficult.

Install an Ethernet switch above the casing server. Take time to configure the switch: set frame size to 9000 bytes of data, set the IP address to a static address that you chose and turn off unnecessary routing protocols such as. STMP snooping.

Install the power distribution unit. Depending on the amount of electricity that will be needed for your nodes at greatest load, you will probably need 220 volts for high performance.

When you install the hardware configuration to deal with. Linux is an operating system that is commonly used for such computer systems. Not only is it an ideal environment for scientific computing research, but you literally do not need a penny to install hundreds or even thousands of nodes. Imagine how much it would cost to install Windows on all the nodes.

Start with installing BIOS on all motherboards (you should use the same BIOS version and if the panels are identical). Install the Linux distribution that you select all nodes. It is important that the version of Linux on the head node has a graphical user interface. Popular choices are CentOS, OpenSUSE, Red Hat Enterprise Linux, and SLES. Probably the best choice seems Rocks cluster distribution.

Install the messaging interface, system resource management, and other necessary libraries. First you will need a portable system manager as Torque Resource Manager, which allows you to share tasks and distribute them on the washing machine. We now need to pair with Torque Maui Cluster Scheduler included to complete the setup of the system. The next step is to install the messaging interface, which is necessary for the individual processing nodes on different computer using the same data. OpenMP is the best choice. Do not forget to multithread libraries and compilers without which we can realize parallel processing on a system.

Networked computing nodes. The main tasks of computing node sends nodes, which must be sent back processing results. Computer nodes also communicate with one another. Use a private Ethernet network to connect all nodes in the cluster. This network must be isolated from the public by ensuring that packets sent by the system will not interfere with other network packets.

Test the cluster. The last thing that you should do before commissioning of the system and is testing its performance. The most popular software package for testing the performance of such systems is HLP benchmark.

Tips

Ganglia are using software to monitor the load on the nodes.
For very high-speed network can use InfiniBand network protocol. If you choose this option, be prepared to set aside a lot of money

Warnings

Make sure that your infrastructure can handle the load.


How to extend the life of your computer?

Sunday, January 27, 2013


Do you feel frustrated every time you use your computer for desperate performance provided? Perhaps you are thinking of buying a new computer, although it requires a lot of money and you will take away a lot of time. Fortunately, there are techniques you can use to extend the life of your computer and thus avoid buying new. In the following, a brief instruction that will help to extend the usefulness of the computer for at least a couple of years, until they make a decision to buy a new machine.

How to extend the life of your computer?

  • Clean your desktop. Cleaning the desktop is like cleaning the rooms, for two reasons. Most likely you will hate to start cleaning, but think about the final results. Let them be your motivation. Another similarity is that you will easily find your stuff, and you'll know where everything is. After cleaning your computer desktop will quickly raise the system because there will be fewer icons to load. To clean your desktop, right-click on it and select "Sort By ..." item and select "Run Desktop Cleanup Wizard". Now you need to click on the "Next" and select the icon you want to remove. This will not delete the icon but would be placed in a folder where it will not be visible. Click "Next" to continue and confirm by clicking on the "Finish" button. Desktop Cleanup Wizard will only remove shortcuts, files and folder will remain unchanged.


  • Run Disk Cleanup. This is a very useful program that comes with Windows operating system. His job is to safely delete unnecessary files. To run Disk Cleanup, click the "Start" button and click "My Computer." Now right-click the drive and select "Properties". Select "Tools" and then "Disk Cleanup". This will start the Disk Cleanup process. Wait for the program to analyze them clearance. When the scan is complete, click on the "OK" button. The process of cleaning the junk files can take, but the results are excellent.


  • Defragment your computer. Defragment is a term for organizing files in a structured manner. Although at first glance might not sound like a method that you can speed up your computer, Defragment is one of the best ways you can do it. To start Defragment repeat instructions from the previous step. The only difference is that instead of you item "Disk Cleanup" clicking "Defragment Disk". Defragment start by clicking the "Defragment". Defragment will last a long time, probably a few hours. Be patient.


  • Scan your computer security software. Viruses are very dangerous and in most cases slow down your computer. Of course, the safety of your data is more important than speed up your computer so that you can protect this step and the security risks. To scan your computer will need some antivirus programs. See the "Full Scan" and start scanning.

  • Optimize starting automatically at boot operating system. When you turn on your computer to launch a bunch of programs that you may not even need them. Run all of these programs will slow down your computer. To avoid this, click on the "Start" button, select "Run" and type "msconfig" and confirm with "OK". When the new window opens, click on the "Startup". For a list of all the programs that run at startup uncheck those you do not need. When you're done, click "OK" and select "Exit Without Restart".


How to clean your computer from dust?

Dust is common on desktop computers can cause serious problems. It slows down the computer, fan noise increases, causing rebooting, but also shortens the service life of components.
To the cooled components in the computer, it is necessary to ensure a good flow of air that enters the room housing computers absorbs the heat released by components, and to the outside of the housing. This forced air flow pulls the dust out of the room, which is then deposited on the fan blades and narrow slits for air circulation in the cabinet coolers and power supplies. This will eventually create barriers to the flow of air and thus prevents efficient heat transfer, so the components overheating.
        Yourself so much you can help your computer so you will occasionally remove cover and carefully remove accumulated dust.
        The most dangerous are the deposition of dust on the slotted housing supply and the fans and CPU coolers and graphics cards.

Power supply
Power supply is one of the biggest "heat sources" in the computer. To cool down, a fan draws air from the housing (and thus helping cool the other components in the chassis, and took him into the surrounding space. Dust which is deposited on the apertures through which the body is sucked air, but also to those on the outside - through which expels the air, restricting air flow, often creating a sort of blanket that covers the entire surface of prehensive openings for circulation of air.

This is definitely the hottest part of the computer, and often the most expensive. When your work out huge amounts of heat, and needs a booster refrigeration system which consists of a heat sink and fan. If there was no heat sink and fan on the processor, it would be during a very short time burned. Fortunately, there are certain protections in the event of increased heat off the processor. Of course, we will not remove the processor and cleaned, in part because it did not come to dust, but the fan above the processor certainly quite dusty.

You are responsible for enable heat dissipation of processors by making the processor fan and heat sink to keep clean.
Some computers have the option of automatically adjusting the fan speed according to the CPU temperature, which frees the processor. If you notice such a fan continuously rotates at maximum speed, then there is a chance that the heat sink and fan clogged with dust.


CPU cooler

  It's a big piece of metal, which, through special thermal conductive paste, aligns directly to the processor, and so absorbs the heat released by the processor. Fridge usually contains a lot of thin ribs to its large surface to help transfer heat to the surrounding air.
At the top of the cooler is mounted fan that pushes air is forced through the radiator fins to be with them so quickly transferred heat that goes inside computer case. Over time, the upper part of the cooling fins were completely covered with dust, and it creates a sort of blanket of dust blocking the circulation of air. If the top of the ribs covered in a blanket of dust that, cooling becomes less or completely ineffective, and a decline in the system, and to the cancellation of the processor.
To get to the dust deposited on the fridge, you have to dismantle fan.To is seemingly easy job because it is usually made by loosening four screws or releasing plastic fuse, but in doing so you have to be extremely careful as it can easily cause mechanical breakdowns sensitive processors. The result of removing dust will surprise you:


Graphic card

All that has been said for the processor and its cooling system, applies to clean dust from the cooling system of the graphics card, especially if it is stronger and therefore has a stronger forced cooling.

Chassis fan
         Heat to open a produce processor, graphics card, hard drives, and other components, must be in some way derived from the housing. This usually makes the same power supply or fan out through the holes in the back of the chassis. For this purpose, it is best to mount a special fan at the rear and side of the chassis, as this helps you now in power does not feed themselves so superheated air out of the chassis. The fan casing is also necessary to periodically clean.


One warning for the end: Never brush and vacuum to roam the inside of a computer. Brush produces static electricity that can damage sensitive electronic components (memory, processor, motherboard), a vacuum cleaner can cause physical damage. Dust is always removes air pressure. For this purpose you can use a special multipurpose spray with air under pressure, a small compressor, and with poorer outcomes and increased vigilance in the work and a good pump for bicycle or car.


How to reset BIOS?

If you happen to have something screwed up in the BIOS, and now your computer will not start, do not give computer in servise centre, you only need to resete BIOS. Folow next steps to Reset Bios.


  1. Unplug PC 
  2. Open computer case
  3. Somewhere above the batterie will find Jumper, next to him says CMOS.
  • It looks something like this
  • Simply take the jumper, and remove by hand. Switch on the left side and leave it for 20 seconds. Again, remove and replace the old position.
  • Assemble and start the computer.
  • When computer starting you will need to press button F1 to continue.

How to install skype, software for free call?

What is skype?

Skype (skype) is a program that enables its users to talk over the Internet free of charge. Just because it's free has become very popular and a lot of people use it. Now that almost everyone has access to the internet, using Skype, you can talk to NPR. relatives abroad for free. Skype allows video calls, so you can also look at if your interlocutor webcam (which is not expensive).

How to install skype?

Skype is very easy to install,first download Skype.


  • The latest version of Skype you can download directly by clicking HERE. On the page that opens, click DOWNLOAD.


  • When download finish, run this downloaded file "SkypeSetup.exe" to start instalation.
  • Now you see this picture


  • In field 1, select the language you want to use Skype. In this case, English. In the field 2, tick checkbox to agree with the general Use Agremenet to use Skype program. Then click Install.
  • Now you see this picture


  • You can specify whether you want to install the Google Toolbar, which is not necessary for the operation of Skype. Then click Next and wait for the Skype installed. On the next screen that appears, click the Start button on Skype.
  • After installing and starting the program Skype for free calls you will see a window where you should click on the link Do not have Skype Name?:


  • Then you see the next picture:
  • In the Full Name field, type the name you want to be seen by other users of Skype for free calls. In the Choose Skype Skype name field, type a name that you will use. Skype name is the most important because by applying it to use Skype! In the Password field, type the password you want to use, in the Repeat Password field, retype the password from the previous field. Click on the box to make it tick and click Next. After that, you will be shown the following picture:


In the E-mail type the email address you use. In the Country / Region, select the country. Click on the box Sign me in when Skype starts and then click Sign In and start using Skype.


That is all. I hope you like this tutorial. 


How to see own ip address

Saturday, January 26, 2013

If you want to see your own ip address you go to one of these link and automatically you will see your ip address.


Website links:


1, Whatismyip : -------------http://www.whatismyip.com/
2. Whatismyipadrress: ------ http://whatismyipaddress.com/
3. Ip-address:--------------- http://www.ip-adress.com/


How to make your pc faster

Friday, January 25, 2013

Your pc is slow?

If the answer is yes folow this 10 step and surely your pc will work faster.


1. Remove unnecessary items


The first step is to remove all unnecessary programs, games and documents that you do not need or do not use them at all.
The control panel is an icon called "Add or Remove" where you can see which programs are installed on your computer and decide that you want to remove. Less - More all know it, but most users do not notice the icon named "Add / Remove Windows Components" where you can remove the components that come with Windows.
It is enough to remove the check mark in front of you no longer want to use and click on Next, if you want to come back and check programs empty box and click Next.


Some Windows programs are not visible in "Add / Remove Windows Components" for example. Windows Messenger, but you can make them visible in the following way:
Go to your Windows directory and then in the INF subdirectory. locate a file called sysoc.ini.
Open it in Notepad, find the row msmsgs = msgrocm.dll, OcEntry, msmsgs.inf, hide, 7
and remove the word hide, so it looks like msmsgs = msgrocm.dll, OcEntry, msmsgs.inf, 7
save the changes and Messenger will now be visible to uninstall.


2. Startup programs and efects - How to turn off?

Installing lots of programs can fill up your registry database unnecessary programs that will start with the computer, which can lead to a slowdown in PC memory and taking part.n

  • Run Regedit "Start> Run and type in regedit and click" OK "
  • Navigate to the key HKEY_CURRENT_USER Software Microsoft Windows CurrentVersion Run
  • When you get to the key, on the right you can identify the programs you do not want to run at start up computer.
  • Right click on the program you do not want to launch at start up computer and select "Delete."
In this way, the programs will not be loaded into memory until it needs them.


Removing visual effects will also recover some memory.
Go to Settings - Control Panel - System - Advanced and Under Performance, click the Settings button in the window Visual Effects pegs just leave the "Use drop shadows and ¿¿Use visual styles", now click the Advanced tab and under Memory usage option select Programs, then click Apply and everything remains the same, but your computer run faster.


3. If you use a lot of work at the time, all the DLLs {dynamic linked library) is loaded into memory by Windows Explorer.
It affects the amount of available memory, and the speed of the computer.
Here's how to make Windows XP to throw out all unnecessary memory dll's:


Looking in the registry
HKEY_LOCAL_MACHINE - Software - Microsoft - Windows-CurrentVersion-Explorer.
In this key, create a new DWORD entry and set the names AlwaysUnloadDLL his value to 1


Services are programs that start with Windows, and they are unnecessary impact on system performance.
Go to Start - Run and type services.msc and now you get a list of services that can include and exclude right-click, choose Properties, and then click Disable. Now the service is turned off.


If you frequently browse the files on your computer off indexing service can slightly


4. Cleaning the registry settings - Deep Cleansing


Let's say you frequently add and remove programs and to take care of uninstalling the program. But in spite of all this, your "registry" files look like monsters because of their size and the paper on your computer difficult.
In this case we will use RegSeeker great program that will provide more than cleaning.


At the beginning of an overview of installed and running and start up the program, which can optionally be prevented from running Windows, and delete files and cookies Histories that collects your Internet browser when surfing.
In addition, RegSeeker you in me "Tweaks" offers some very useful tricks and features.


And we come to the main part of which is called the Clean Registry. All you need to do is click on the "OK" button and wait for it to finish scanning, then click on Select All, right-click and select the option Delete selected items. Now is your registry cleaned of accumulated garbage.


In the event that after cleaning the computer does not work properly, made ​​RegSeeker Back up all of the deleted files that you can go back by pressing Backups.


Notice: The program is free and can be downloaded here 


5. XP on the wings - The Fast and the Furious

This tutorial can perform all the users of Windows XP operating system, but because of the great need for memory its effect will not be seen as to whether the acceleration with less than 256 MB of RAM.

DisablePagingExecutive - enabling this option prevents the recording of certain applications on the hard drive of your computer. With that will significantly speed up all processes because it is known that working memory is a thousand times faster than the virtual hard disk. The value of this option is 0, so that the switch is set to 1

This item is located at the following places in the Registry Editor:
HKEY_LOCAL_MACHINE - System-CurrentControlSet - Control - SessionManager - Memory Management.

A further option that is right next to the aforementioned: LargeSystemCache.
When activated, "forcing" load the operating system and its processes in memory.

With this change the Windows XP operating system loads the kernel and keeps it in memory, making the entire system much faster and more vivid to work.


6. Accelerate data transfer - DMA - Fashion

Win XP does not properly set DMA mode on IDE channels. Most CD-ROM supports this mode, but XP is almost always puts them in PIO (slow) mode. DMA will not speed up your CD-ROM, but will use less processing power and thus speed up data transfer.

  • Here's how:Open Device Manager (My Computer, Hardware, Device Manager)
  •  Click the plus sign next to "IDE ATA / ATAPI Controllers" and double-click on "Primary IDE Channel"
  •  Under the "Advanced Settings" check the Device Settings 1. It's probably set to PIO transfer mode.
  •  Set it to "DMA if available".
Repeat this for the "Secondary IDE Channel" if it is in PIO mode.

If this does not help, in most cases helps to reinstall the IDE channel that does not want to accept DMA mode, as follows:

Right-click on the IDE channel, then Uninstall and click OK.
Restart the computer and see now whether the IDE channel DMA mode accepted.

In some cases, the most you'll get is a multiword, but it is in any case much better than PIO mode.


7. A little more acceleration - The final showdown


  •  Do not forget to use the Disk Defragmenter tool. You can find it at:
"Start / Programs / Accessories / System Tools / Disk Defragmenter."
Maintaining the disk in this way, or you can increase performance by defragmenting your computer up to 10%, and prolong the life of the HDD.

  •  If you have a little more "RAM", and it applies to users who have 256 MB or more, you can configure Windows to use the most efficient. Open the "SYSTEM.INI" file in "windows", "directory" and "[386Enh]" section add the line "ConservativeSwapfileUsage = 1".
In this way, you actually indicate Windows to significantly reduce the use of virtual memory.

 If you already have an SYSTEM.INI, efficient use of the DMA capabilities and add the line "DMABufferSize = 64". Save the changes and restart your computer!


8. Speed ​​up surfing - Internet nitro

On the Internet you can find a bunch of programs that offer you a faster connection and load programs and Web pages, and as a rule almost never free. All promising acceleration no matter what type of connection you use, plain modem, ISDN connection, or a new, even faster way of connecting to the Internet.

You can achieve significantly accelerate a small correction to the registry key. Run Regedit and find the key that is located at the following site:
HKEY_LOCAL_MACHINE - Software - Microsoft - Windows - Current Version - Explorer - RemoteComputer - NameSpace.

At this point, there are two key present;
One of them is [D6277990-4C6A-11CF-8D87-00AA0O60F5BF].
Wipe it. It is not necessary to restart the computer to notice the acceleration caused by changing the registry editor.

You've now actually fix one of the bugs in Windows XP.


9. Set the modem - Modem to the maximum

You can connect to the Internet and you are satisfied with the displayed speed, but it seems that the flow of data disaster.

You have used all kinds of tricks, "Tweak" programs and "dial up" accelerators, and it seems you are all somewhere else for a much nicer I ask is that it is not a mistake or a bad modem to the phone line.

Probably not, but the fault is in the undersized speed "port" on which modem works. "COM port IDs" by default speed is set to "9600 bps".

Open Device Manager (Start - Settings - Control Panel - System - Hardware - Device Manager) then click on Ports, and select "port" on which the modem. Then click on Properties, Port Settings, and change the Bits per second at the maximum value and click "OK".
Now, the speed at which the "port" done a lot more communication and not a limiting factor.


10. Finishing work - tuning

Although Windows has a lot of options for setting, opportunities and apply for tweaking assorted tricks, we will not describe them now because it turned into a huge article that would never have the title "Setting in 10 Steps" because we had to add another zero to this number.

However, we left you with the opportunity to play around yourself tool that comes with Windows and is very much customizable options, called the Group Policy Editor.

By this tool comes in the following way: Start - Run and type gpedit.msc, click "OK" and you have opened the possibility for detailed setup Windows without going through the system registry or peeping in the Control Panel.


First meet

Hello everyone, I decided to open this blog beacause i want to teach other people to make some works
on PC, internet and software. I will posting tutorials about every day. I write all tutorials (not copy-past).
Shortly i will post my first tutorial on this blog.